
Are you thinking of starting your yoga journey but don’t know where to start? Let me help you, whether you want to loose weight or release stress or any reason you have, you can start your practice with these poses. These poses will help you built strength and create a strong foundation.
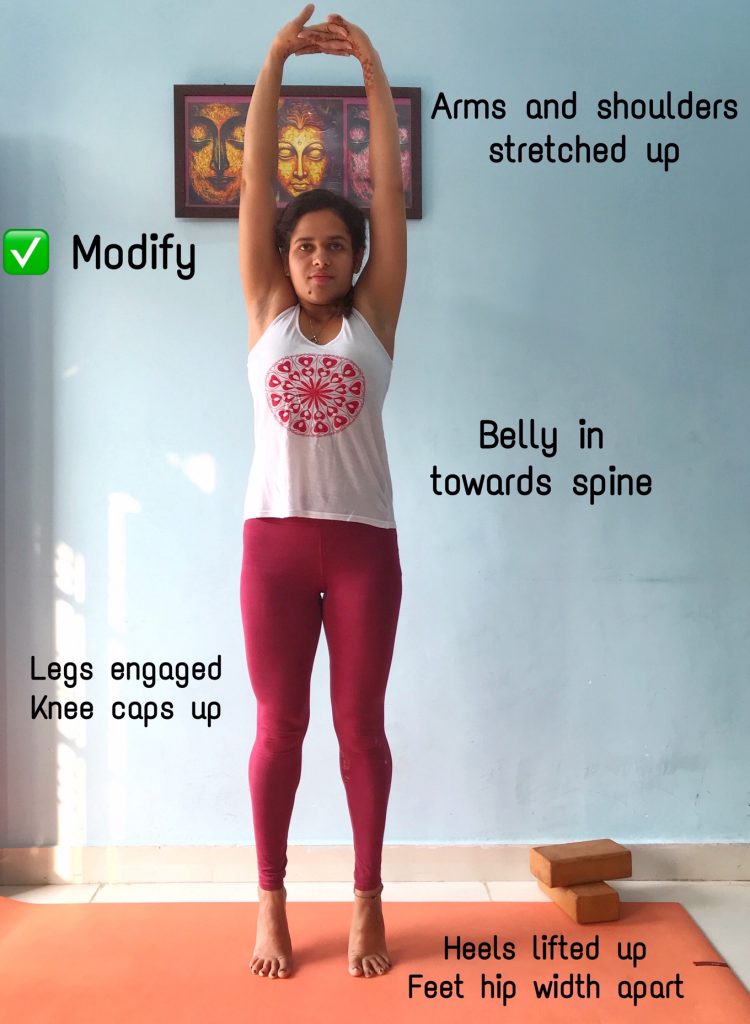
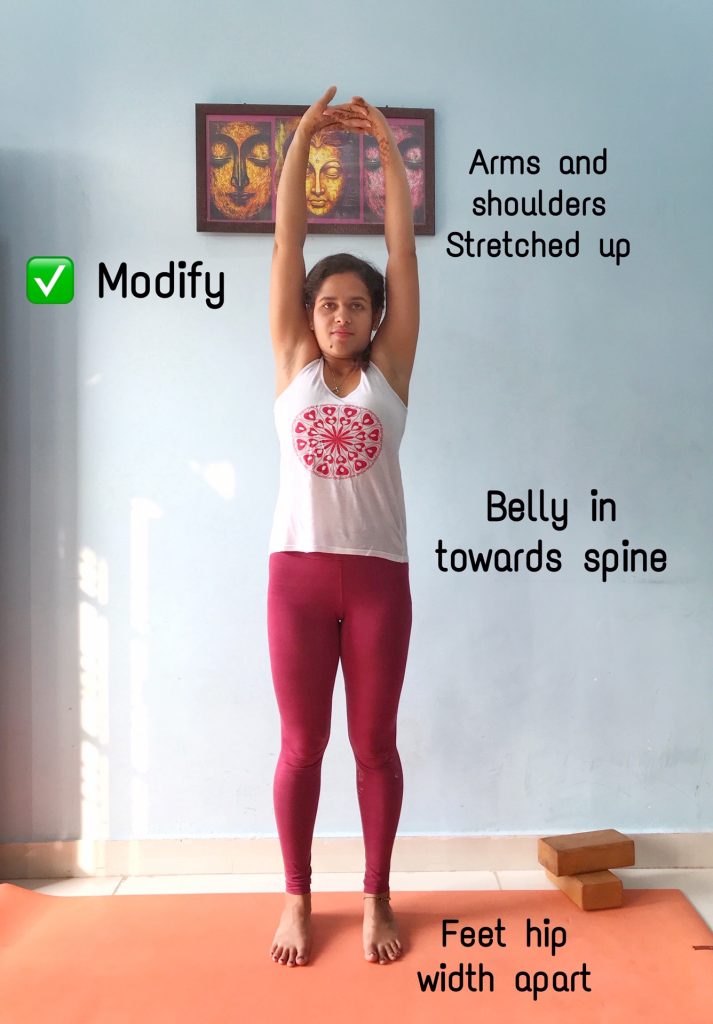
- Tadasana ( Palm tree pose )
“Tada” meaning “palm tree” and “asana” meaning “posture”
How to do it?
Stand with both feet together and arms by the sides. Shift your weight equally on both feet. Now raise the arms over your head. Interlock the fingers and turn the palms upward and stretch your arms and shoulders up. Keep looking at one point in front of you and lift your heels up and find your balance on the balls of your feet and hold the pose for few breaths. Lower the heels with exhalation and release your hands. Repeat the same for 10 more times.

Modification:
- Open your feet hip width apart if your ankles are crashing into each other.
- Without lifting your heels, stretch your arms up if you are not able to find balance on the balls of your heels.
Benefits:
- It will develop physical and mental balance.
- It helps to increase height by stretching the muscles and ligaments.
- Good for pregnant ladies during their first 6 months of pregnancy to keep the abdominal muscles and nerves toned.
- It improves the body posture.
- It strengthens your ankles, calves, knees, thigh, legs and arms.
Contraindications:
- During pregnancy keep your feet hip width apart.
- People with heart problems and low blood pressure shouid avoid holding it for too long. You may start feeling dizziness if you hold it longer.
2. Tree pose (Vriksasana)
“Vriksha” meaning “Tree” and “Asana” meaning “Posture”
How to do it?
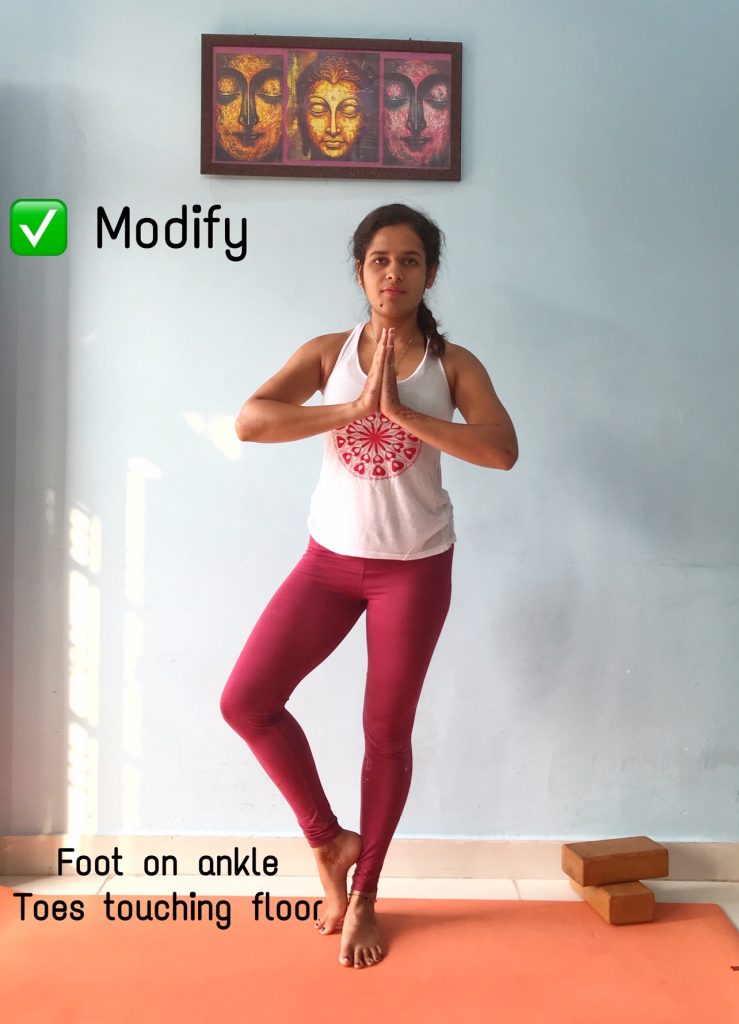
Stand with your both feet grounded and distribute your weight equally on both feet. Spread your toes evenly on the floor and create a strong foundation. Shift your weight to your left foot, Now place the sole of your right foot on your left calf or your left inner thigh. Bring your palms into Namaste in front of your heart. Keep pressing your right foot into your inner thigh and your thigh back into your foot, it will keep your hips squared. Engage your left leg, pull your left kneecap up. Concentrate at one point to find balance. Stay there for 5-10 breaths and slowly lower your right leg and repeat on the other side.
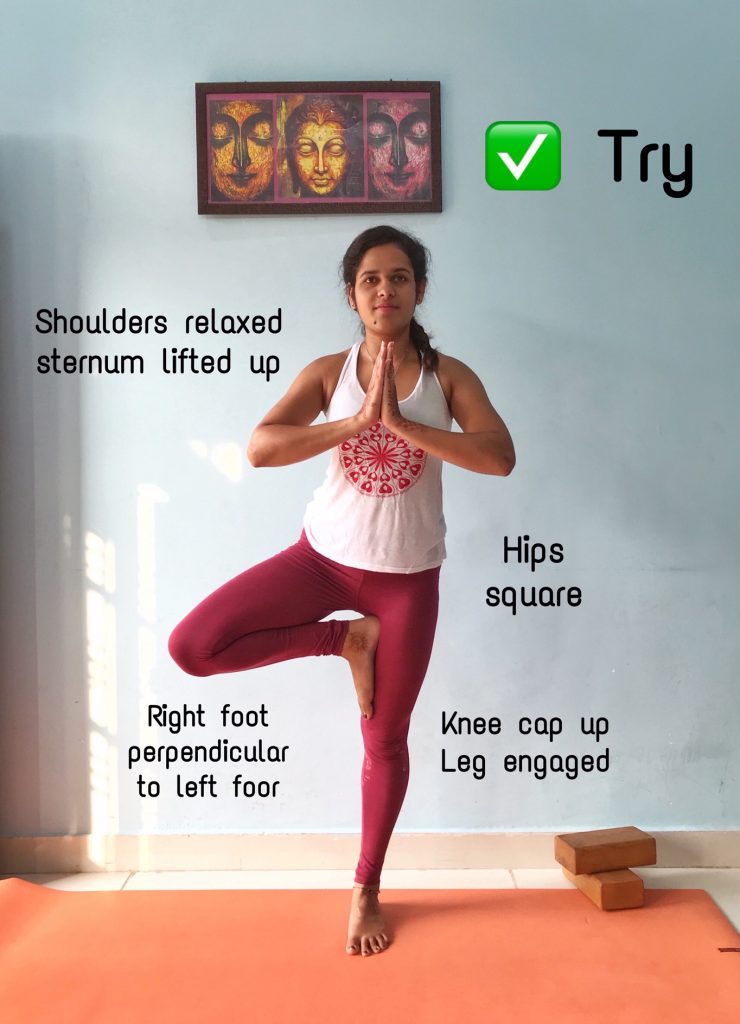
Modification:
- Instead of placing left foot into your inner right thigh, you can place it on your right ankle with your toes touching the floor.
- If you still feel shaky, use a wall touching your butt against the wall.
- It will improve your balance, concentration and stability.
- It strengthens your ankle, knee, calves and legs.
- Good for opening your hips and groins.
- It is a great way to help relieve sciatic pain over time.
- It will calm your mind and improve mental balance.
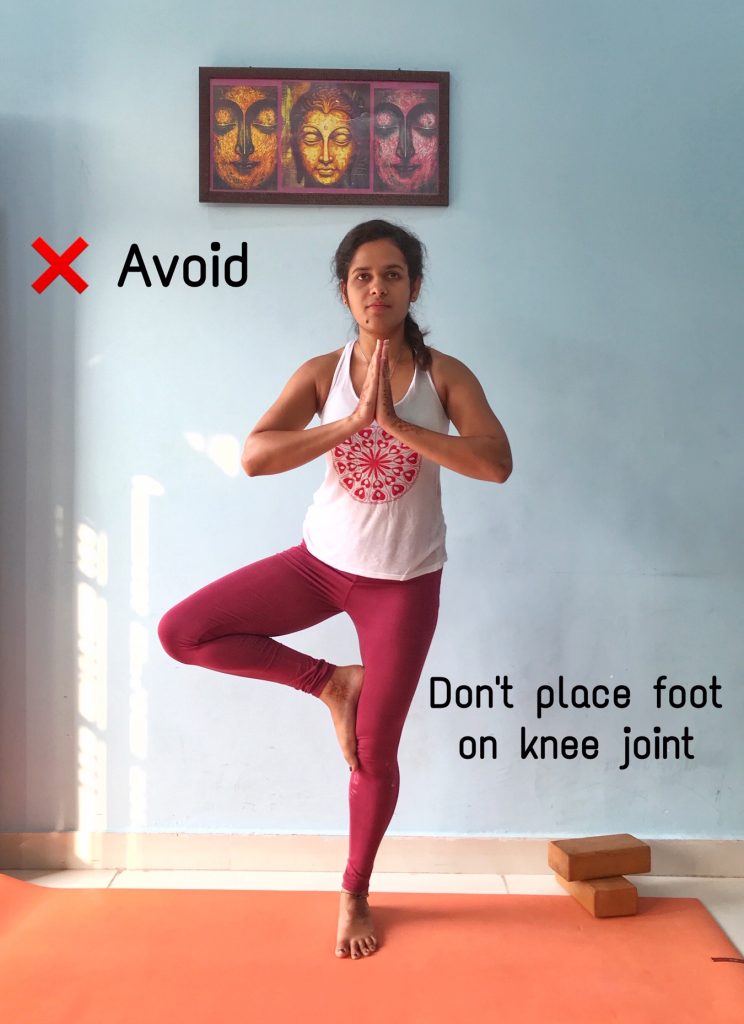
Contraindications:
- Don’t place your foot on knee joint, you may place it on calf or thigh.
- People with high blood pressure should avoid practicing this asana or under supervision is recommended.
- People with knee or ankle injury should also avoid this asana.
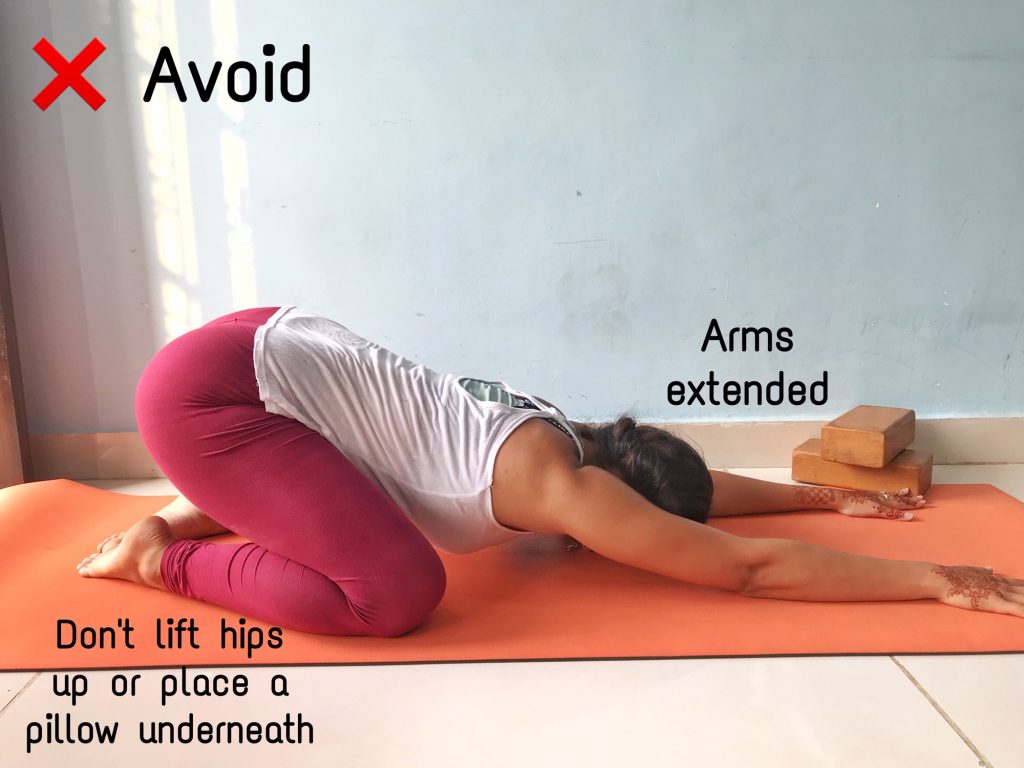
3. Child pose (Balasana)
“Bala” meaning “child” and “asana” meaning “pose”
How to do it?
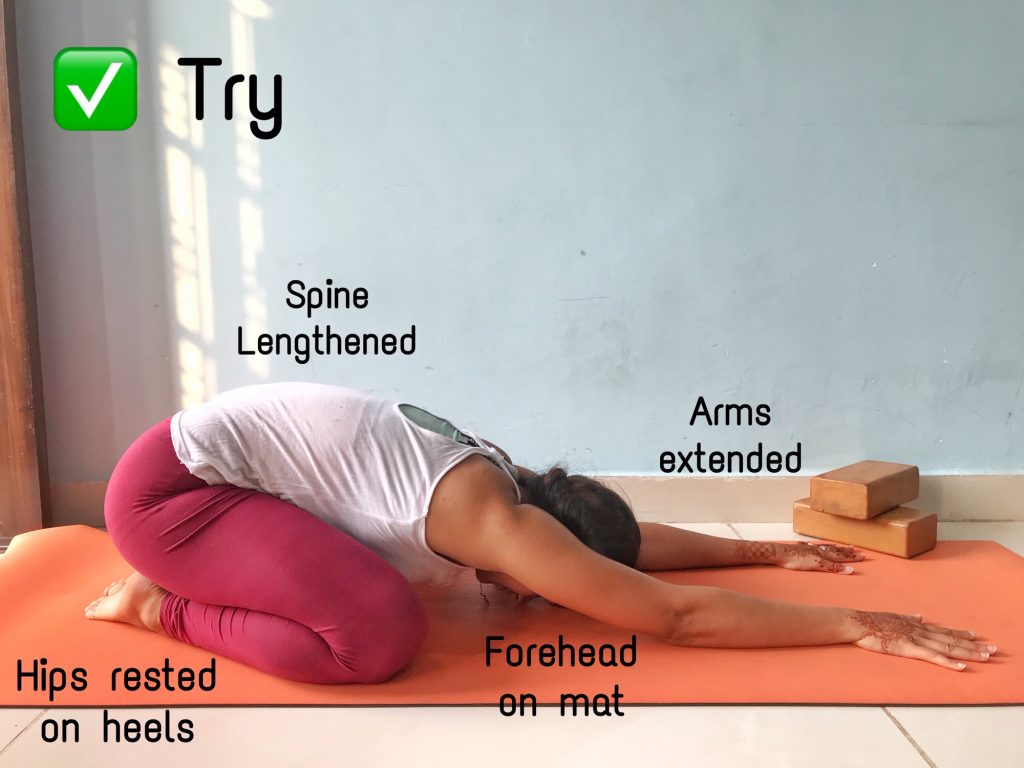
Starting with sitting on your heels, big toes touching each other and open your knees wide. Now walk your arms forward palms touching the floor and place your forehead on the floor, resting your belly between your thighs. Neck should be neutral and relaxed. Push your hips back on your heels if you feel them lifted up. Hold the pose for 8-10 breaths and slowly come back up.
Modification:
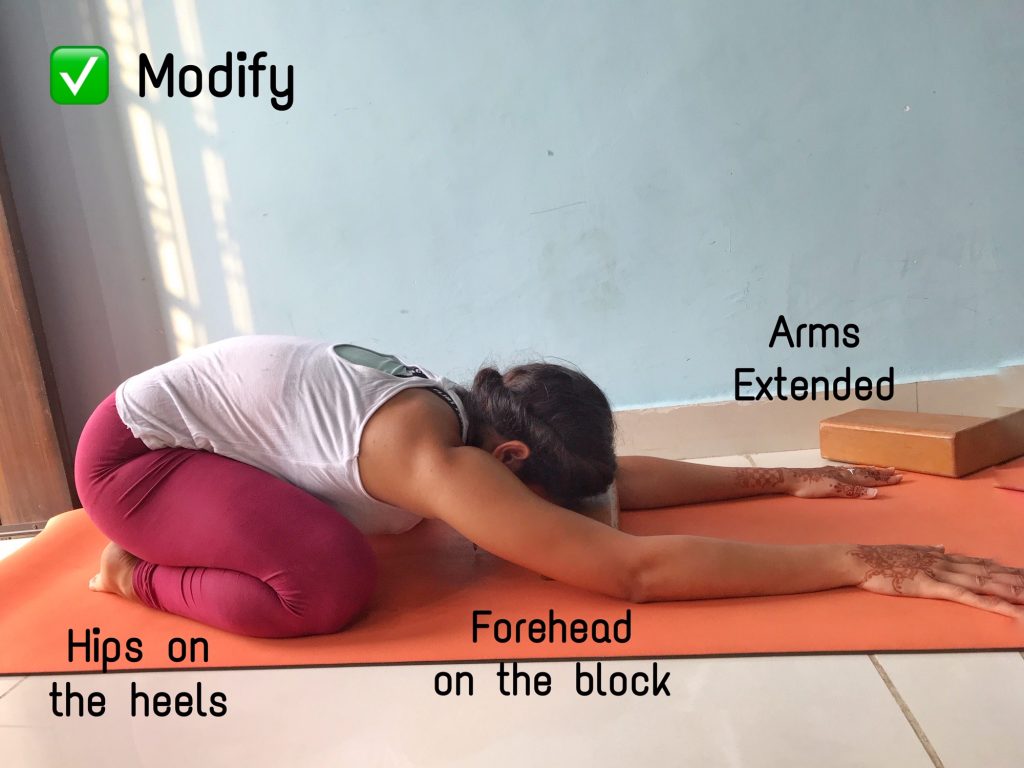
- If you have tight hips, your can keep your knees together.
- If you are not able to touch your forehead on floor, place a bolster or block under your forehead.
- Place a blanket under your knees if you feel pressure or pain in your knees.
- You can extend your arms back next to your feet, your palms facing up.
Benefits:
- Great pose for calm your mind and helps relieve stress.
- Good for digestion.
- Great hip opener for beginners.
- It gently stretches shoulders, ankles, thighs and hips.
- It relieves neck and lower back pain.
Contraindications:
- Pregnant woman should avoid doing this asana.
- If you have knee or ankle injury, avoid doing this asana.
- Avoid if you have diarrhea.
- People with high or low blood pressure should consult their doctor before practicing.
4. Cobra pose (Bhujangasana)
“Bhujang” meaning “cobra” and “asana” meaning “pose”
How to do it?
Start with lying on the belly and chin on the floor, bring your legs together long and stretched and press the tops of your feet on floor. Place your palms under your shoulders close to your chest. With inhale, start extending your arms, lift your chest up and lengthen through spine, your gaze up. Slightly bend your elbows in, close to your ribs. Roll your shoulders back and down. Extend your arms if possible for full cobra. Hold the pose for 2-3 breaths and slowly bend the elbows and lay on your belly placing your forehead on floor.
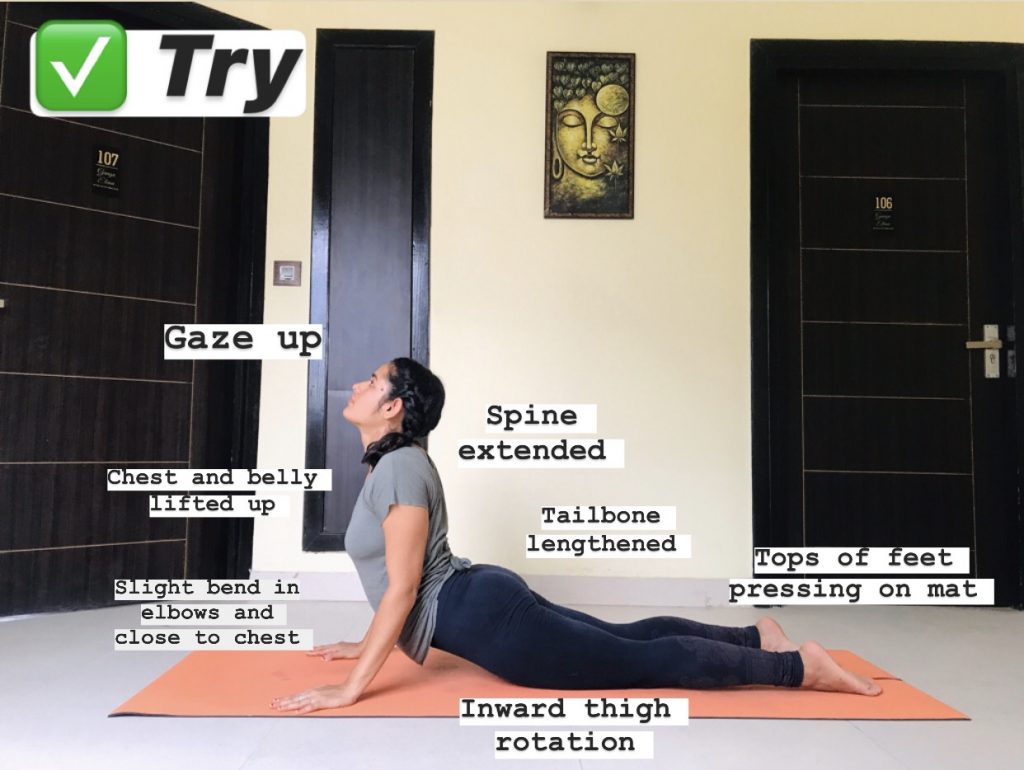
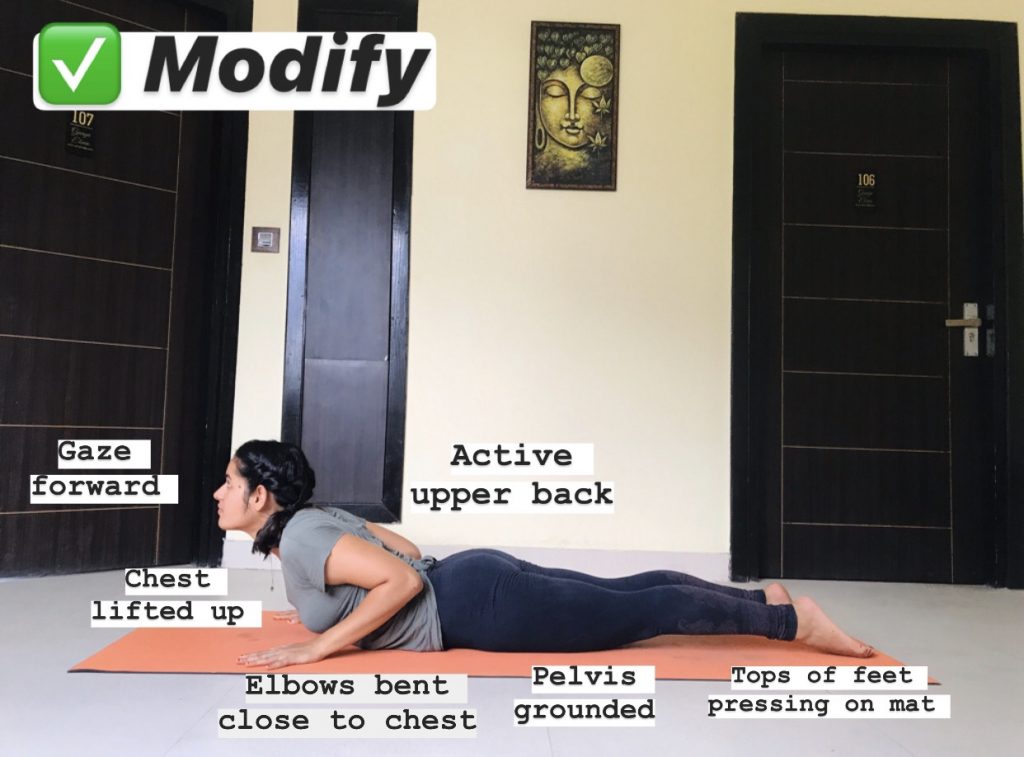
Modification:
- Bent the elbows in the beginning. Eventually straighten the arms when you feel more comfortable in the pose.
- You can try half cobra, placing your forearms on the floor.
- You can try another variation with seal pose, walking your hands forward and lift your chest up. Your hips will stay on the mat.
Benefits:
- It stretches chest, lungs, abdominal muscles and shoulders.
- It relieves backache, neck pain and constipation.
- It helps to improve postures.
- It helps relieve stress and fatigue.
- It helps in opening the chest thus encouraging deep breathing.
- It stretches the neck and improves the functioning of thyroid glands.
Contraindications:
- Pregnant women should avoid this asana.
- People who have back injury should also avoid.
- People who have breathing disorder or asthma should also avoid.
- Someone having neck problems relating to spondylitis should avoid this.
- Someone who has ulcer or recent abdominal injury should also avoid this asana.
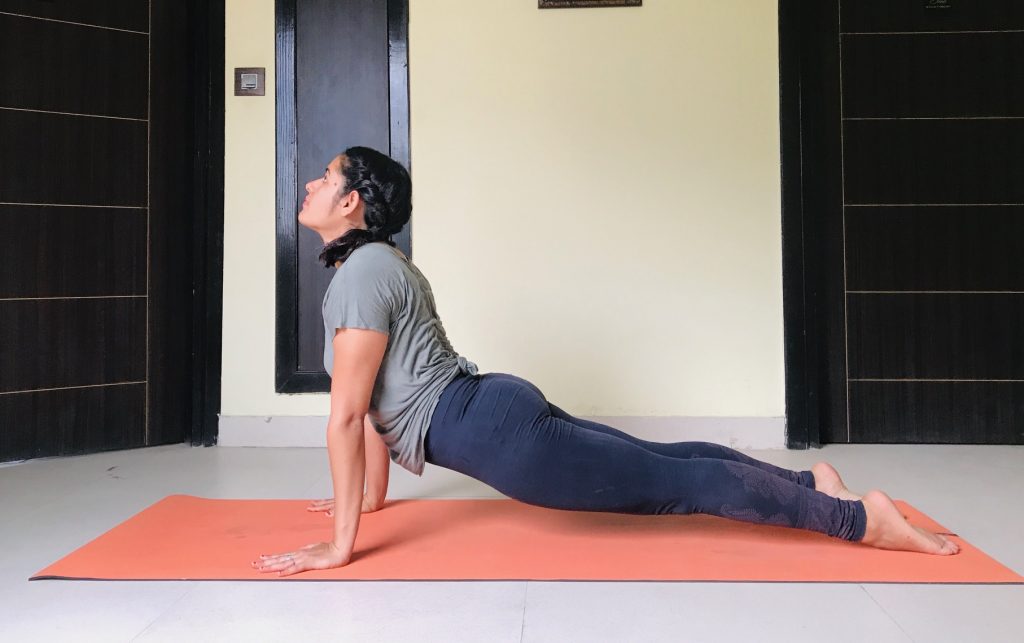
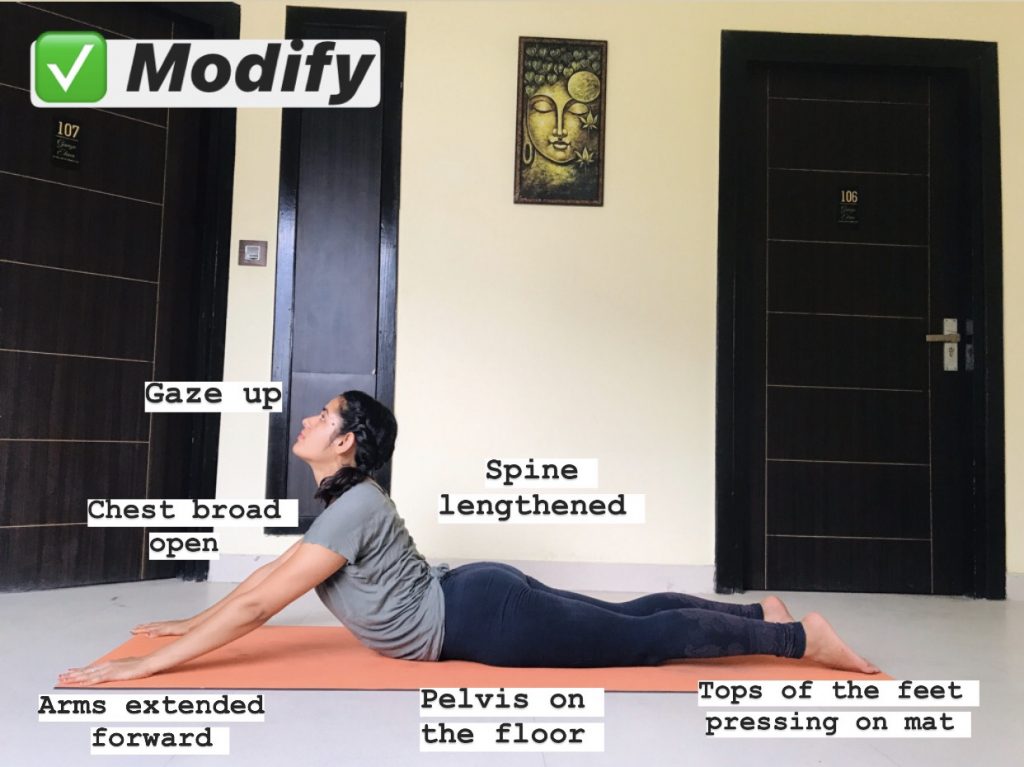
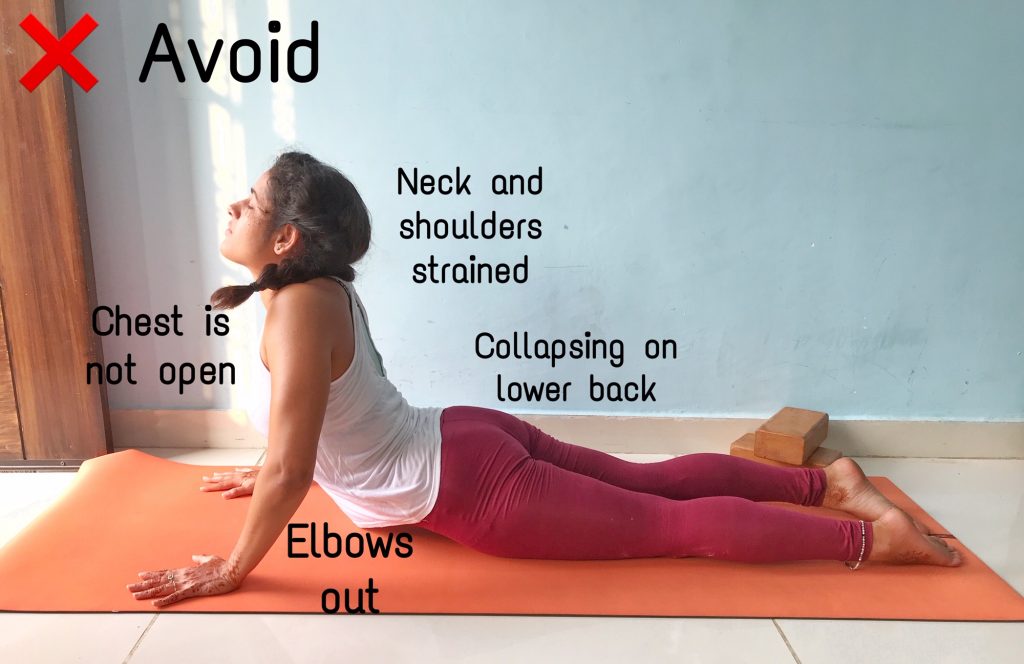
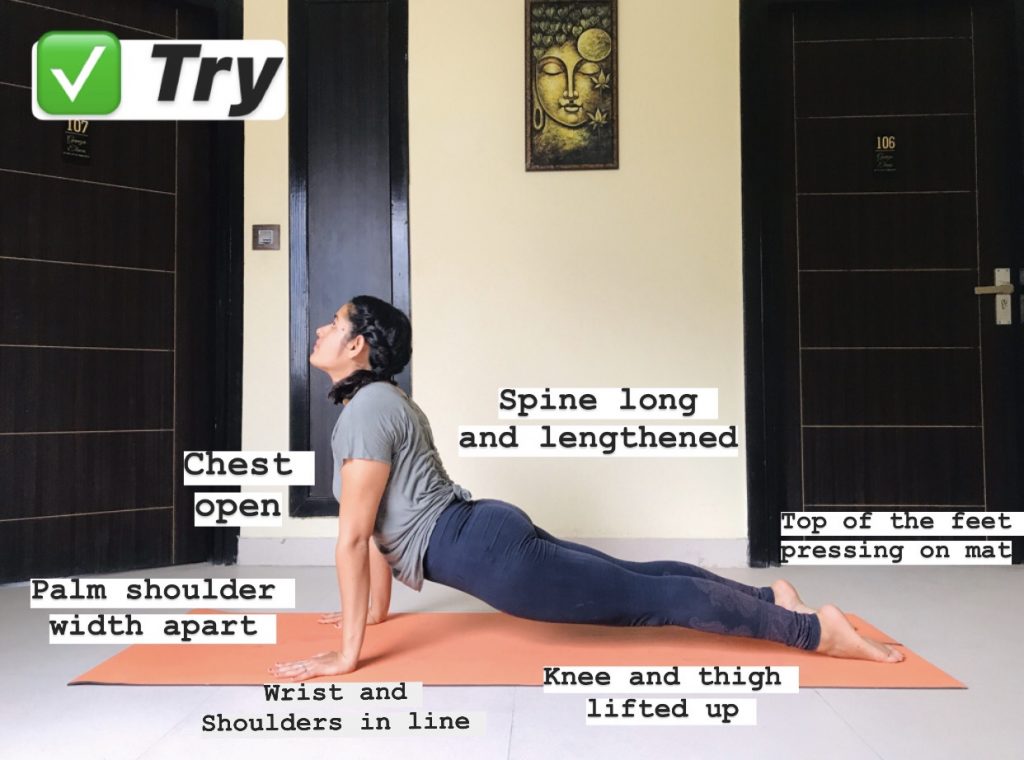
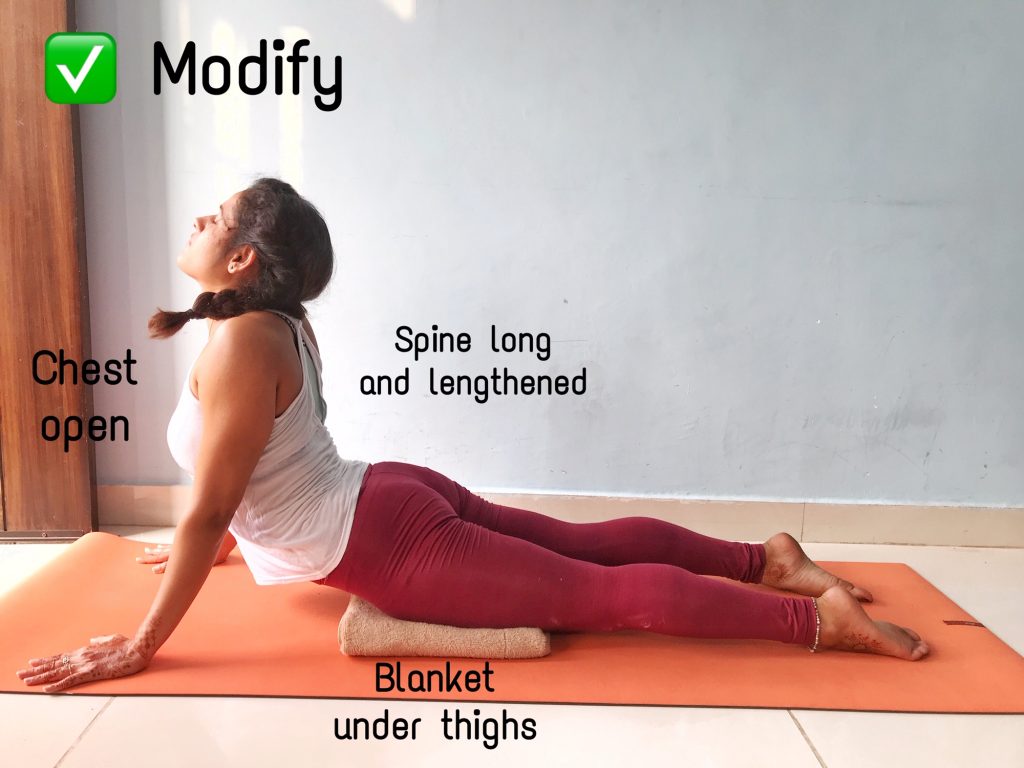
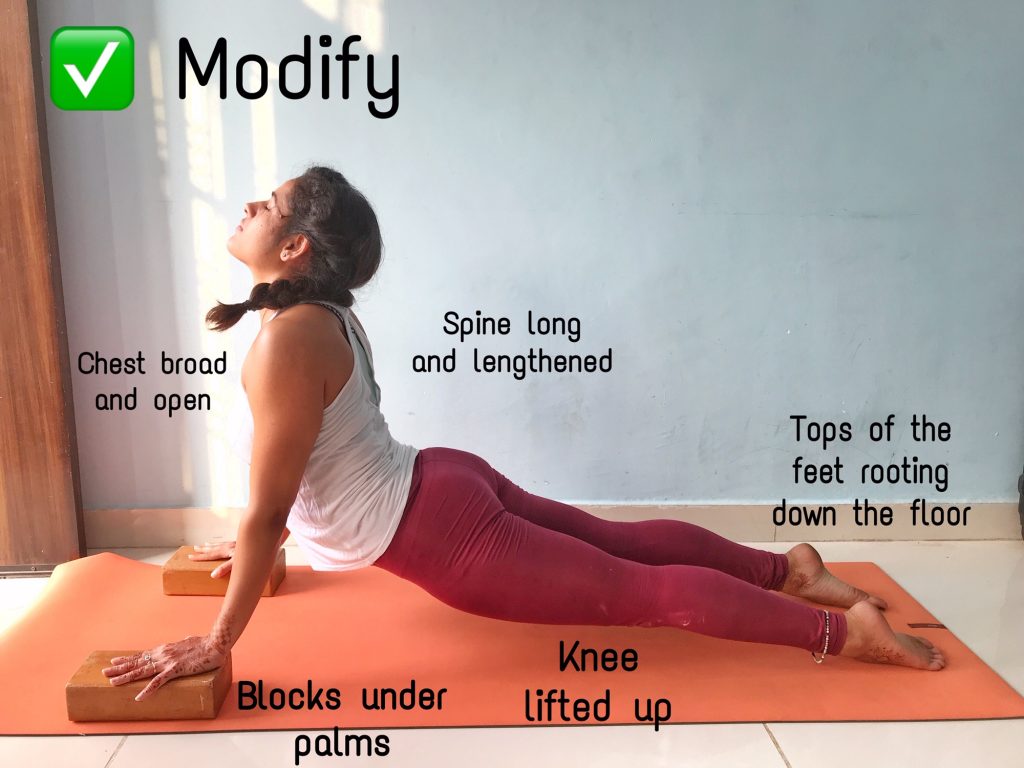
5. Upward facing dog (Urdhva mukha svanasana)
“Urdhva mukha svana” meaning “Upward face dog” and “asana” meaning “posture”
How to do it?
Start with lying on the belly both legs long and stretched back with tops of your feet on floor. Place your palms by your chest. With inhale press your palms on the floor and lift your chest and shoulders off the floor extending your arms. Now lift your knees off the floor pressing the tops of your feet on the floor and lengthen through the spine. Expand your chest forward, your gaze up, roll your shoulders back and down. Reach the crown of the head up towards the ceiling. Hold it for 2-3 breaths and slowly bend your elbows, lower your knees on the floor and come all the way down placing your forehead on the floor.
Modification:
- Place yoga blocks under your palms to get an elevation from the floor.
- If you are not able to lift your knees and thighs up, place a rolled blanket under your thigh.
- If it is still hard you can try baby cobra.
Benefits:
- It strengthens the wrists, arms, spine and back.
- It opens the chest, sternum and strengthens upper body.
- It helps relieve depression, fatigue, and sciatica.
- It stretches chest, lungs, shoulders, and abdomen muscles.
- It helps reverse the countless hours of sitting and slouching we do all day at our desks.
Contraindications:
- Avoid during pregnancy.
- Avoid if you have wrist injury.
- Avoid if you have recent abdominal surgery or shoulder injury.
- Avoid if you have headache.
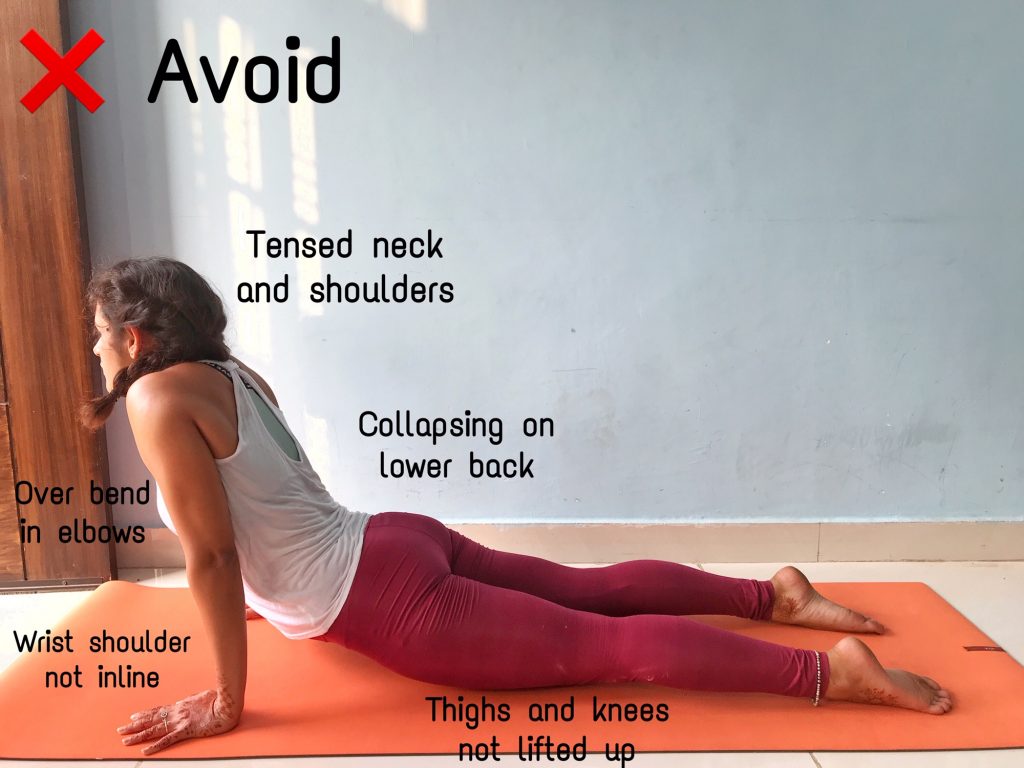
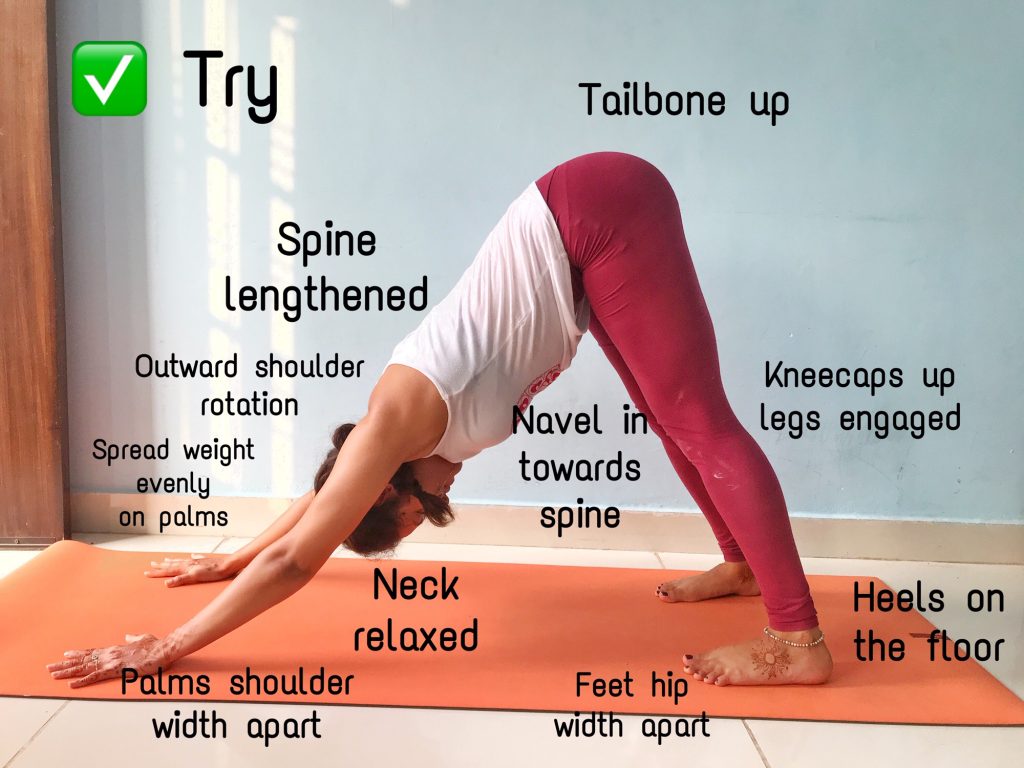
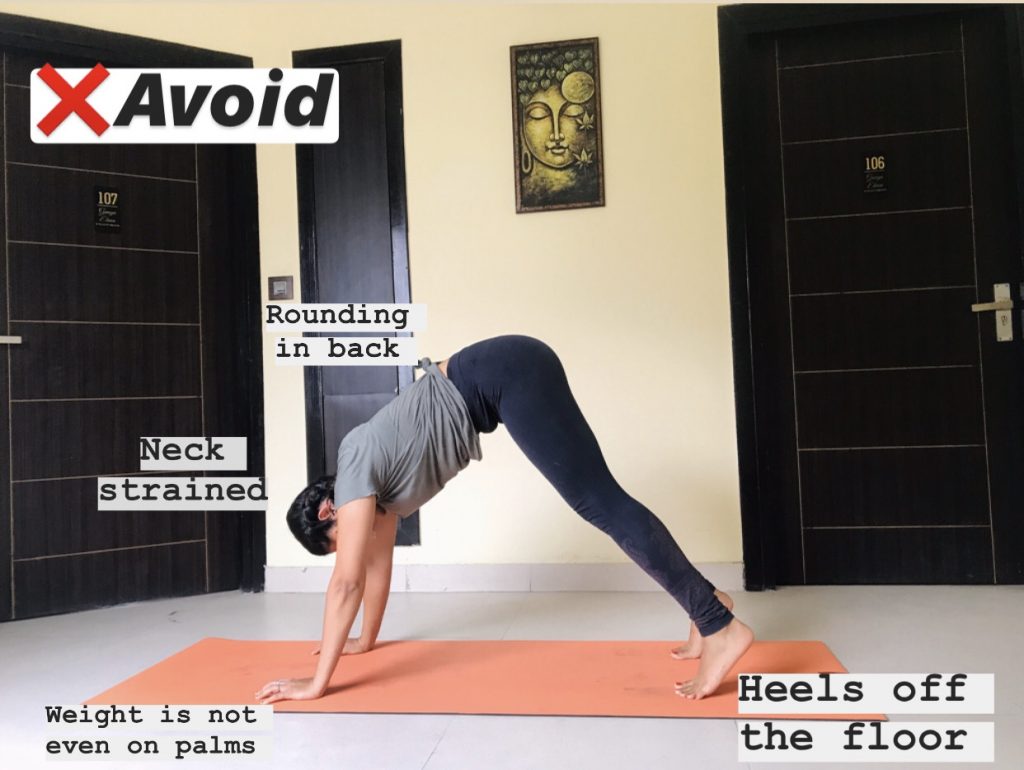
6. Downward facing dog (Adhomukha svanasana)
“Adho mukha” meaning “downward face” and “svana” meaning “dog”
How to do it?
Starting with table top position, wrists inline with shoulders and knees inline with hips, knees hip width apart, toes pointed back. Now walk your hands one palm length forward so they are past your shoulders. From here, tuck your toes and lift your knees up, keeping your knees bent, send your buttocks up towards ceiling. Extend your arms and Lengthen your spine, press with all fingers evenly on the mat. Rotate your shoulders out away from ears. Push your Navel in towards spine and chest towards thighs. Push the top thigh back and press your heels on the floor. Try to straighten your knee but be sure not to lock them. Hold it for 2-3 breaths and then bend the knees and lower the hips back to table top position, or come all the way down to child pose.
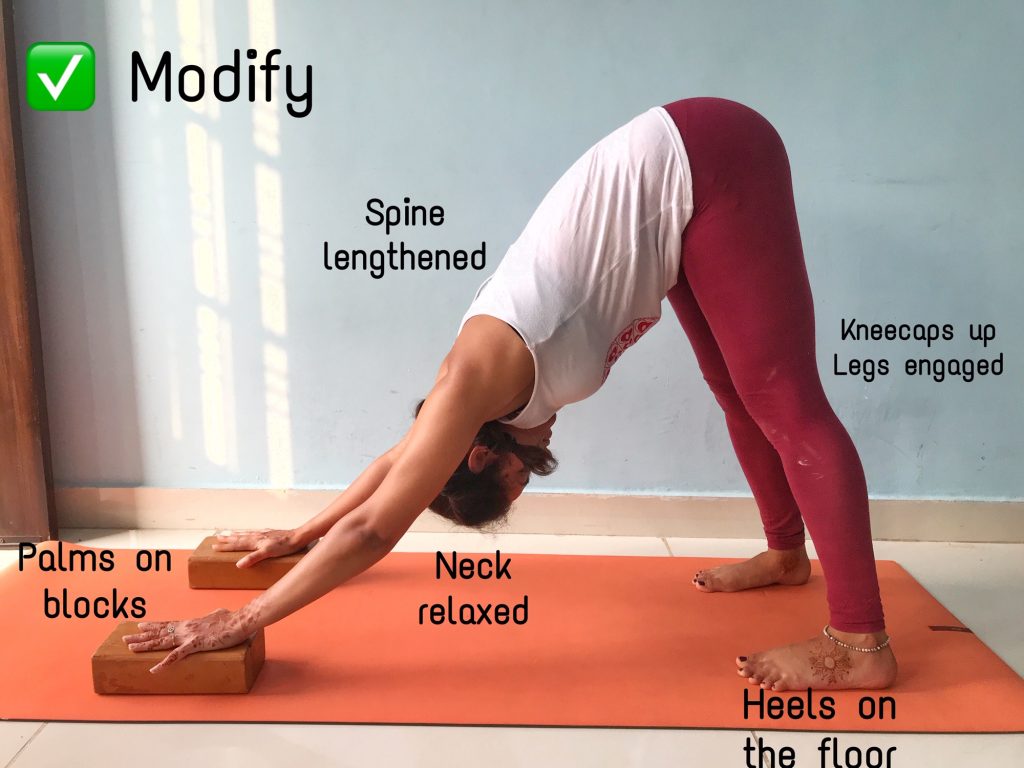
Modification:
- Bend the knee if you have tight hamstrings or place block under your heels. Try not to round your back.
- Place a yoga block under your wrist if you feel pain in your wrist.

Benefits:
- Great asana to prepare your body for inversions.
- It calms your mind and nervous system and Bring your mind into present moment.
- It strengthens your arms, legs and shoulders.
- It helps relieve insomnia, headache and back pain.
- It improves concentration, hearing and eyesight.
Contraindications:
- People with high blood pressure should not hold this pose for long time.
- People with wrist or shoulder injury should avoid this asana.
- If you have vertigo or slip disc, avoid this asana or consult a doctor before attempting.
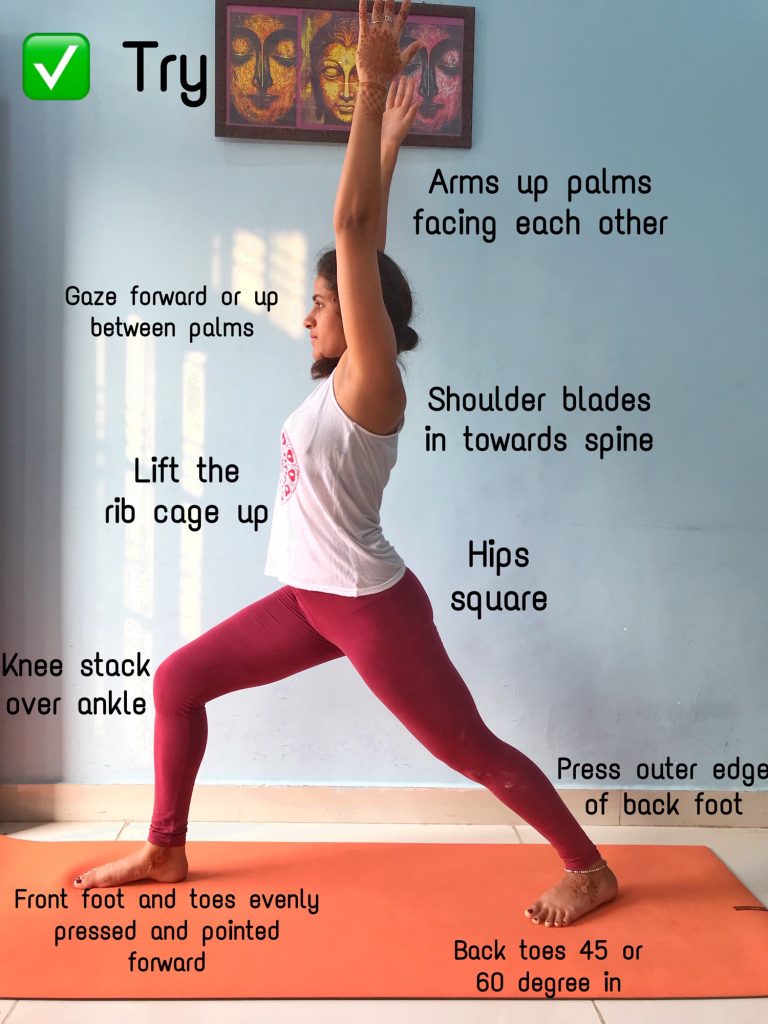
7. Warrior I (Virbhadrasana I)
“Virbhadra” meaning “Warrior” and “asana” meaning “posture”
How to do it?
Starting from tadasana, Step right foot 3-4 feet back into high lunge position, right heel up. Now place the right foot completely on the floor, 45 or 60 degree angle in. Bend your left knee inline with left ankle. And push your right hip forward squaring your hips. If you are flexible enough try align your left thigh parallel to floor. Now reach up through your arms parallel to each other or join the palms together if possible, lifting the ribcage away from the pelvis. Relax the shoulders down and draw the shoulder blades in towards spine and open your chest. Keep your head neutral and look up if possible or look in front of you. Hold the pose for 5-6 breaths and with exhale lower the hands on the floor. And repeat the same on the other side.
Modification:
- If you are not able to touch your back foot completely on the floor, lift your heel up and hold in high lunge. Keep your hips squared.
- If lifting your arms up is not possible, bring your palms into Namaste in front of your heart or grab your waist until you find your balance.

Benefits:
- It strengthens your thighs, calves and ankles.
- It is great pose for opening your hips as it stretches groins.
- It strengthens shoulders and arms.
- It improves concentration, balance and groundness.
- As it stretches your whole body, encourages good circulation.
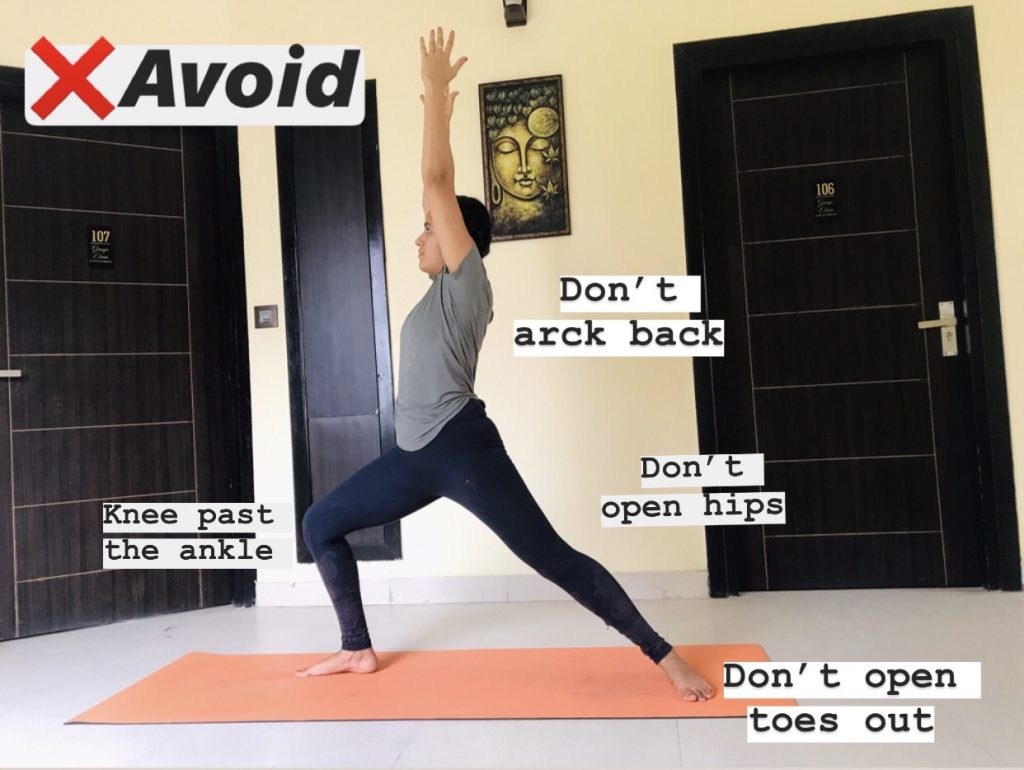
Contraindications:
- During menstruation and pregnancy avoid practicing this asana.
- People with high or low blood pressure should not hold it for long time or try modifications.
- People who have knee or ankle injury should avoid or consult a doctor before attempting.
- If you have shoulder, hip or back injury then avoid this asana.
So I want you to try these with the modification and later on with the practice you will be able to do final pose. Hope you enjoyed reading and you can practice my online beginners class linked below.